How To Get Acrylic Nails Off Safely At Home
Want to take off your acrylic nails without a trip to the salon? It's a common thought, especially when they start to grow out or you just fancy a change. Doing it yourself can save you time and money, and with the right approach, you can actually keep your natural nails looking good. So, if you're wondering how to get a acrylic nail off, you've come to the right place.
Many people worry about damaging their natural nails when removing acrylics at home, and that's a very real concern. It's true that improper removal can leave your nails thin, brittle, or even a bit sore. But, you know, with a little patience and the right steps, you can avoid most of those problems. It's all about being gentle and giving your nails some love.
This guide will walk you through the simplest and safest ways to get those acrylics off. We'll cover what you need, how to prepare, and the steps for a gentle removal process. Plus, we'll talk about how to care for your nails afterward, because that's just as important, you know, for keeping them strong and happy.
Table of Contents
- What You'll Need for Home Removal
- Preparing Your Nails for Removal
- The Soaking Method: A Step-by-Step Guide
- The Flossing Method: An Alternative Approach
- Aftercare for Your Natural Nails
- Common Questions About Acrylic Nail Removal
What You'll Need for Home Removal
Before you start, it's a good idea to gather everything you'll need. This makes the whole process smoother and, you know, less messy. Having your tools ready means you won't have to stop halfway through, which can be a bit frustrating, you know?
Essential Tools
Nail Clippers: You'll need these to trim down the length of your acrylics. Shorter nails are easier to work with, that's just a fact.
Coarse Grit Nail File: This is for filing off the top layer of the acrylic. You want something that can really get through that hard surface, so, a fine file probably won't do much good here.
100% Pure Acetone: This is the star of the show, actually. It's the only thing that will really dissolve the acrylic. Make sure it's pure acetone, not nail polish remover that just has a bit of acetone in it. That kind just won't work effectively, you know?
Cotton Balls or Cotton Pads: These will hold the acetone against your nails. You'll need quite a few, so stock up a little.
Aluminum Foil: Cut into small squares, these will wrap around your fingers to keep the acetone-soaked cotton in place. You want pieces big enough to really seal around your finger, more or less.
Cuticle Pusher (Wood or Metal): This is for gently pushing off the softened acrylic. A wooden stick is often a good choice, as it's a bit softer than metal, but metal works too if you're careful.
Nail Buffer: Once the acrylic is off, you'll use this to smooth out your natural nails. They'll probably be a bit rough, so this helps a lot.
Nail Oil or Moisturizer: Your nails and cuticles will be dry after the acetone, so, this is really important for putting moisture back in.
Optional Items
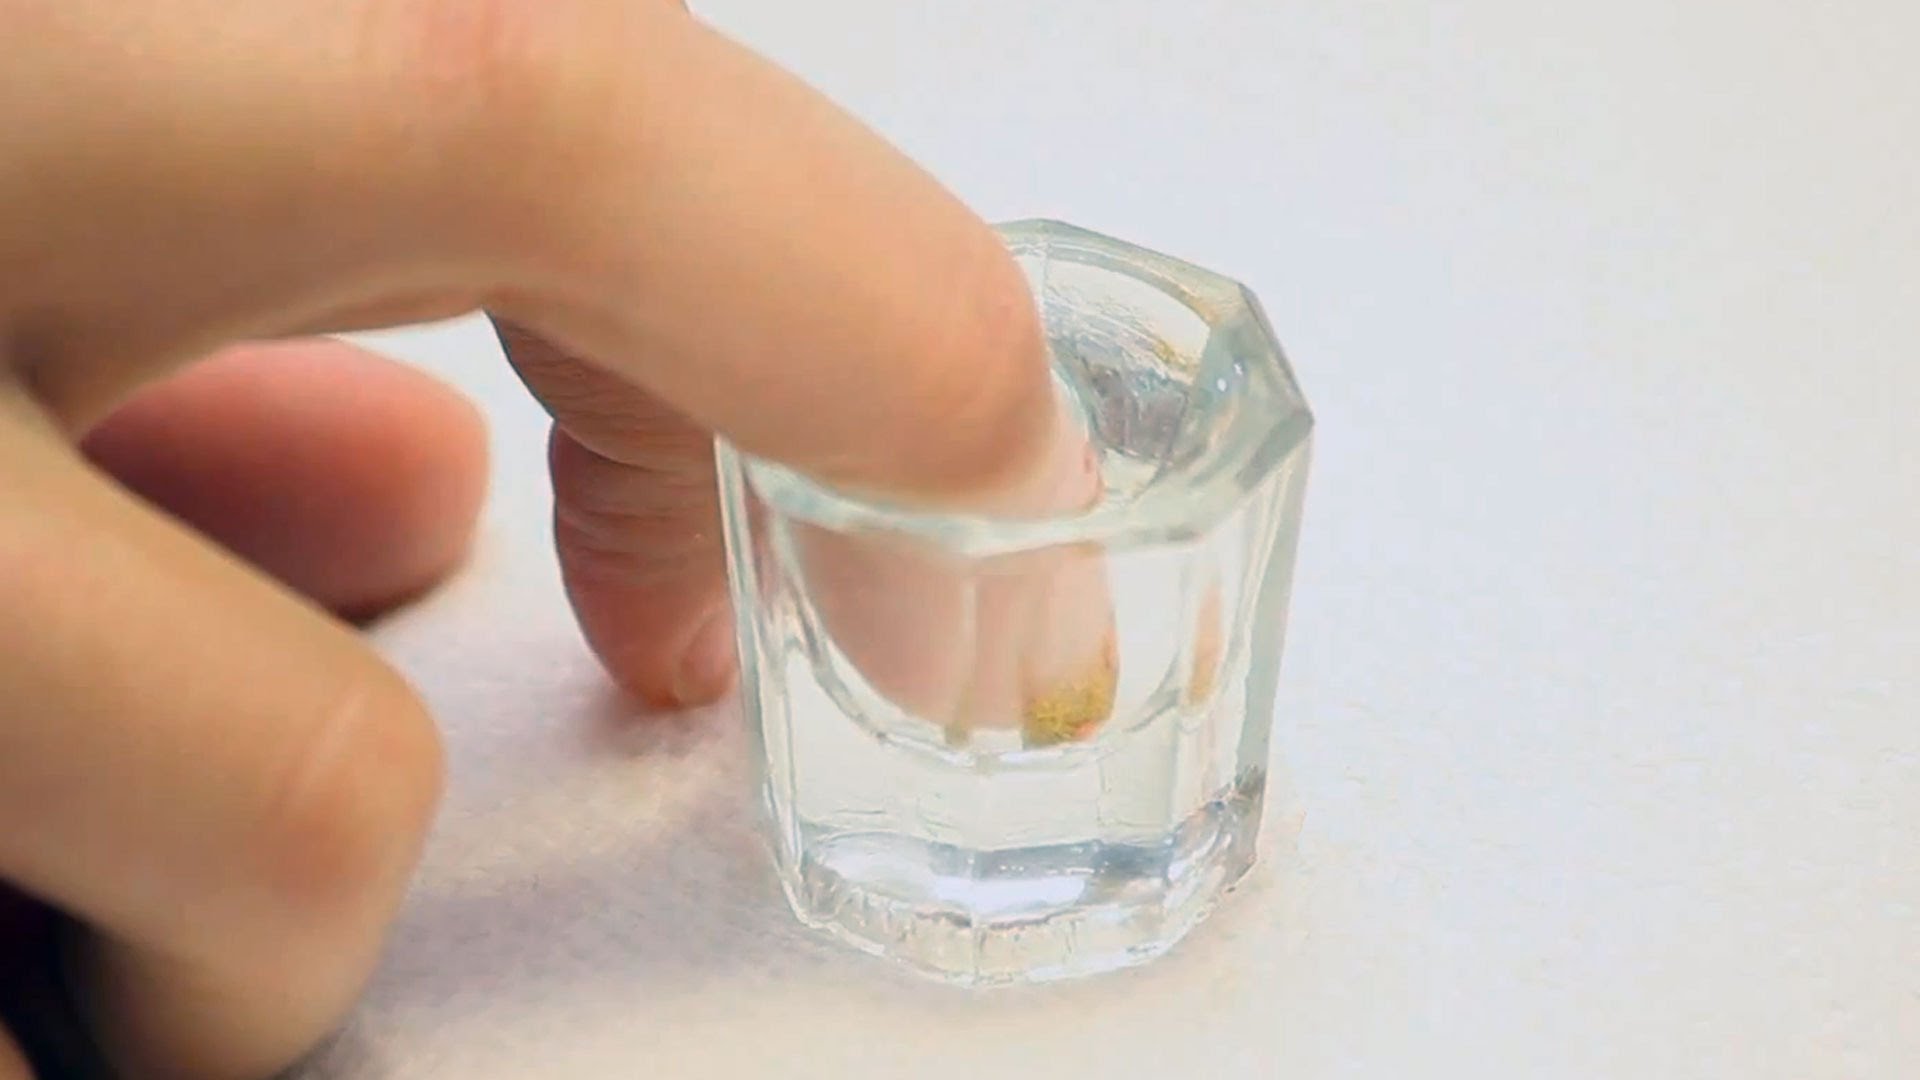
Small Glass Bowl: If you prefer to soak your entire hand rather than wrapping each finger, a glass bowl is useful. Just make sure it's glass, as acetone can react with some plastics, you know.
Warm Water (for a water bath): A bowl of warm water can help speed up the acetone's work. You just place the acetone bowl inside the warm water bowl, sort of like a double boiler, but for your nails.
Old Towel: Acetone can be pretty harsh on surfaces and fabrics, so, laying down an old towel protects your workspace. This is actually a really good idea.
Petroleum Jelly or Thick Cream: Applying this around your cuticles and skin before soaking can protect them from the drying effects of acetone. It's a simple step that makes a big difference, honestly.
Preparing Your Nails for Removal
First, a bit of preparation helps a lot, you know. It makes the actual removal process quicker and less of a hassle. Think of it as getting everything ready for a smooth operation, because, well, it is sort of an operation on your nails.
Start by finding a well-ventilated area. Acetone fumes can be pretty strong, so, open a window or turn on a fan. You don't want to be breathing that stuff in too much, as a matter of fact. Lay down your old towel to protect your table or counter from any spills.
Next, use your nail clippers to trim down the length of your acrylics as much as you can. The shorter they are, the less acrylic there is to dissolve, which means less soaking time. Just be careful not to clip your natural nail underneath, that's really important.
After clipping, grab your coarse nail file. You'll want to file off the very top, shiny layer of the acrylic. This breaks the seal and helps the acetone penetrate more effectively. You don't need to file all the way down to your natural nail, just enough to make the surface rough and dull. This step is pretty crucial, actually, for the acetone to do its job properly.
Finally, and this is a step many people skip but really shouldn't, protect your skin. Apply a generous amount of petroleum jelly or a thick cream around your cuticles and the skin surrounding your nails. Acetone is very drying, and this barrier will help keep your skin from getting too parched or irritated. It's a simple little trick that helps a lot, you know?
The Soaking Method: A Step-by-Step Guide
This is, by far, the most common way to get those acrylics off. It's also generally considered the safest method for your natural nails, provided you're patient and gentle. It involves soaking the acrylic in acetone until it softens and can be gently pushed away. It takes a little time, but it's worth it, you know?
Step 1: Trim and File
As we talked about, start by clipping your acrylics down to a very short length. Then, use your coarse file to rough up the top surface of each acrylic nail. This helps the acetone soak in better. You're just trying to break that top seal, not remove the whole thing right away. This is, arguably, the first really important step.
Step 2: Protect Your Skin
Generously apply petroleum jelly or a heavy moisturizer to the skin around each nail, including your cuticles. This creates a barrier against the drying effects of the acetone. It's a small thing, but it makes a big difference for your skin, you know, keeping it from getting too dry or irritated.
Step 3: Soak with Acetone
Now for the main event. You have two main options here: individual wraps or a full hand soak.
Individual Wraps: This method is often preferred because it exposes less skin to the acetone. Take a cotton ball or pad and soak it completely in 100% pure acetone. Place the saturated cotton directly on top of your acrylic nail. Then, take a pre-cut square of aluminum foil and wrap it tightly around your finger, securing the cotton ball in place. Make sure it's snug, so the acetone doesn't evaporate too quickly. Repeat for all ten fingers. This takes a bit of time, but it's pretty effective, honestly.
Full Hand Soak (Alternative): If you prefer, you can pour 100% pure acetone into a glass bowl. You might want to place this glass bowl into a larger bowl of warm water (not hot!) to create a warm bath. This gentle warmth can help the acetone work a little faster. Submerge your fingers into the acetone, ensuring your acrylics are fully covered. This method can be quicker, but it exposes more of your skin to the acetone, so, be extra diligent with your skin protection.
Regardless of the method you choose, you'll need to wait. Typically, you'll want to let your nails soak for about 15 to 20 minutes. For some stubborn acrylics, it might take a bit longer, perhaps 30 minutes or even more. You'll know it's working when the acrylic starts to look gooey, soft, or even crumbly. Don't rush this part; patience is key, you know. If it's not soft enough, it's just not going to come off easily.
Step 4: Gently Remove Softened Acrylic
Once the waiting time is up, unwrap one finger at a time (or remove your hand from the bowl). The acrylic should be noticeably soft. Use your cuticle pusher to very gently scrape off the softened acrylic. It should come off easily, almost like butter. If you find yourself having to force it or really dig, stop! That means the acrylic isn't soft enough yet. Re-soak that nail for another 5-10 minutes. Forcing it off is how you damage your natural nail, and we definitely want to avoid that, you know?
Work on one nail at a time. As you finish one, re-wrap the others if they're still soaking, to keep them warm and working. This process can be a little messy, so, keep your old towel handy. You might need to repeat the soaking and scraping process a few times for very thick or stubborn acrylics. It's all about being gentle and letting the acetone do the hard work, basically.
Step 5: Buff and Clean Up
After all the acrylic is off, your natural nails will probably feel a bit rough and look dull. This is completely normal. Use your nail buffer to gently smooth out the surface of your nails. Buff in one direction, not back and forth, to avoid causing more friction. This will help remove any remaining tiny bits of acrylic and smooth out any ridges. You're just trying to get them feeling nice and even, you know.
Finally, wash your hands thoroughly with soap and water to remove any lingering acetone residue. This is really important for getting rid of that strong smell and any chemicals that might still be on your skin.
The Flossing Method: An Alternative Approach
For those who, perhaps, don't want to soak for ages, this is an option. It's a method that some people use, but it does come with a bit more risk. This approach involves using dental floss to separate the acrylic from your natural nail. It's not for everyone, and it really does require a lot of care, or even better, another person to help you.
How it Works
To try this, you'll first need to lift a small edge of the acrylic nail, perhaps with a cuticle pusher. Once you have a tiny gap between the acrylic and your natural nail, you or a helper can slide a piece of dental floss into that gap. Then, with a back-and-forth sawing motion, you gently work the floss down the nail bed, slowly separating the acrylic from your natural nail. It's sort of like flossing your teeth, but for your nails, you know?
This method carries risks. There's a much higher chance of tearing or damaging your natural nail if you're not extremely careful or if the acrylic isn't lifted properly. It's very easy to pull off layers of your natural nail along with the acrylic. Because of this, many nail professionals actually advise against it. It's really best to stick with the soaking method if you can, as it's far less likely to cause harm. But, you know, it is an option some people consider.
Aftercare for Your Natural Nails
Once the acrylics are gone, your natural nails will probably need some extra kindness. They've been covered and protected for a while, and the acetone can be very drying. Think of this as a recovery period for your nails, and giving them some love now will help them get back to being strong and healthy. It's a bit like giving them a spa day, you know?
The first thing to do is to deeply moisturize. Apply a good quality nail oil or a rich hand cream to your nails and cuticles several times a day. Massage it in gently. This helps to rehydrate the nail plate and the surrounding skin, which will be feeling pretty thirsty after the acetone. This step is, arguably, the most important for immediate recovery.
Give your nails a break from any harsh treatments. Avoid applying new polish or extensions right away. Let them breathe and recover for at least a week, or even longer if they seem particularly weak or damaged. During this time, you might want to keep them trimmed short to prevent breakage. Shorter nails are less likely to snag or chip, which is pretty helpful when they're a bit fragile.
Consider using a nail strengthener. There are many products available that are designed to fortify weak or brittle nails. Apply these as directed, and they can help speed up the recovery process. It's a good way to give your nails an extra boost, you know?
Also, be mindful of everyday activities. When doing chores that involve water or harsh cleaning products, wear gloves. This protects your newly exposed natural nails from further drying or damage. It's a simple habit that makes a big difference in the long run, honestly.
Finally, stay hydrated and eat a balanced diet. Healthy nails grow from within, so proper nutrition plays a role in their strength and appearance. Drinking enough water and getting plenty of vitamins and minerals can support overall nail health. It's not an immediate fix, but it really does help over time, you know?
Common Questions About Acrylic Nail Removal
People often have a few questions when they're thinking about taking off their acrylics at home. It's natural to wonder about the best way to do things, and to worry about potential issues. So, let's go over some of those common thoughts, because, well, it's good to be informed, right?
Can I just peel off my acrylic nails?
Absolutely not! This is one of the quickest ways to severely damage your natural nails. When you peel or pry off acrylics, you're not just removing the artificial layer; you're also tearing off layers of your own nail plate. This can leave your nails thin, weak, painful, and prone to breakage. It can even lead to infections if the nail bed is exposed or injured. So, please, avoid peeling them off. It's really not worth the damage, you know, even if it seems like a quick fix.
How long does it take to remove acrylic nails at home?
The total time can vary a bit, but you should set aside at least an hour, possibly up to two hours, for the entire process. The actual soaking time for the acetone is usually 15-30 minutes per hand, but you also need to factor in time for trimming, filing, protecting your skin, and then gently scraping. If your acrylics are very thick or particularly stubborn, you might need to re-soak them a few times, which adds to the duration. It's not a super fast process, but it's much quicker than dealing with damaged nails later, you know.
What if I don't have pure acetone?
If you don't have 100% pure acetone, then, honestly, it's best to wait until you can get some. Regular nail polish removers, even those that say "with acetone," typically contain a much lower concentration of acetone, along with other ingredients that won't effectively dissolve acrylic. Trying to use these will likely just waste your time and leave you frustrated, as they simply won't break down the acrylic properly. They might soften it a little, but not enough for safe removal. So, to avoid a lot of hassle and potential damage, pure acetone is really the way to go. You can usually find it at beauty supply stores or even some drugstores. You might find more helpful information on nail health from a trusted beauty resource, like this article on nail care after extensions. Learn more about nail care on our site. For tips on maintaining healthy cuticles, visit this page.
DIY Acrylic Nail Designs

Best Selling Acrylic Nail Tools for Salons - Get More Done in Less Time

Best Selling Acrylic Nail Tools for Salons - Get More Done in Less Time
