Your Guide To Writing The Cursive J: Steps For Beautiful Handwriting
Have you ever looked at a beautifully written note and wished your own handwriting could look just as elegant? For many, the cursive letter "j" can seem like a bit of a mystery, a tricky shape that sometimes feels a little different from other letters. Yet, getting comfortable with this letter is, in a way, a key step in making your cursive flow smoothly and look really nice. This piece is here to help you get a good handle on writing both the small "j" and the big "J" in cursive, giving you simple ways to make your letters look consistent and lovely.
There's something truly satisfying about putting pen to paper and seeing graceful, connected letters take shape. The cursive "j," with its unique loop and tail, adds a certain charm to your writing, doesn't it? It's not just about forming the letter itself, but also about how it joins up with others, creating a continuous, pleasing line. We'll explore how to approach this letter with ease, giving you practical tips and showing you where to find helpful materials.
Whether you're picking up cursive for the very first time, or you're simply looking to polish your handwriting, figuring out the "j" is a worthwhile effort. Many folks find that getting this particular letter right helps them feel much more confident about their whole cursive style. So, let's get into the details and help you make your "j" look just right, adding a touch of class to all your written words. You might be surprised how quickly you get the hang of it, too.
Table of Contents
- Why the Cursive J Matters for Your Handwriting
- Getting Started: The Lowercase Cursive J
- Tackling the Capital J in Cursive
- Connecting Your J for Fluid Writing
- Practice Makes Perfect: Using Worksheets and Resources
- Troubleshooting Common Cursive J Hurdles
- Your Handwriting Journey: Moving Forward
- Frequently Asked Questions About Cursive J
Why the Cursive J Matters for Your Handwriting
The cursive "j" might seem like just one letter, yet it plays a pretty big part in how your overall cursive looks. It has a distinct shape that, when done well, adds a lovely flow to your words. Learning to form it correctly helps with the rhythm of your writing, too, making it feel more natural and less like you're drawing individual letters. It's often a letter that people focus on to improve their overall penmanship, you know?
For many, getting comfortable with the "j" means they're ready to take their cursive handwriting to the next level. It's a letter that often includes a descender loop, which is that part that goes below the line, and getting that loop just right is a good skill to have for other letters as well. So, in a way, mastering the "j" is quite a step forward for your entire cursive journey.
Thinking about how people are using cursive today, it's really about personal expression and a touch of tradition. While typing is common, a handwritten note with a well-formed "j" can really stand out. It shows a bit of care and attention to detail, which is something many people appreciate. This makes working on your "j" quite valuable, actually.
Getting Started: The Lowercase Cursive J
When you're first getting a feel for the cursive "j," it's often best to begin with the lowercase version. This letter, the small "j," has a particular motion that involves going down below the line and then looping back up. It's a shape that, with a little practice, you can get pretty good at. We've got some ideas to help you get started, too.
Step-by-Step for the Small J
To start your lowercase cursive "j," you'll begin a little below the middle line, then curve up to touch it. Next, you'll bring your pen straight down, going below the baseline. This is where the loop happens, so you'll curve up and to the left, crossing your original downstroke and continuing up to the middle line to prepare for the next letter. Don't forget the dot, which you add above the letter after you've finished the main shape. It's a bit like a dance, isn't it?
Think about the movement as a single, fluid motion. You want to avoid stopping and starting too much, which can make your letter look a bit choppy. Keeping a steady hand and a light touch helps a lot. Remember, the goal is to make it look smooth and connected, so practice this motion over and over. You'll find it gets easier with each try, really.
Many folks find it helpful to trace the letter a few times before trying to write it on their own. This helps your hand get used to the shape and the path it needs to take. You can even find tracing sheets that are specifically made for this, which are quite useful, apparently. They guide your hand, which is pretty neat.
Making Your Strokes Smooth
Smooth strokes are what make cursive look so good, and the "j" is no exception. When you're writing the lowercase "j," try to keep an even pressure on your pen. Too much pressure can make your lines thick and less graceful, while too little might make them too faint. It's about finding that just-right balance. This can take a little bit of getting used to, you know?
Another thing that helps with smoothness is keeping your arm and wrist relaxed. If you're gripping your pen too tightly or tensing up, your letters might look stiff. Let your hand move freely across the page. It's almost like you're letting the pen do some of the work, which is kind of cool.
You might find that practicing the basic stroke of going down and looping back up, without even forming the full "j," can help. This helps build muscle memory for the movement. Just repeating that single motion can make a big difference in how smooth your final letters appear, truly. It's a simple trick, but it often works.
Tackling the Capital J in Cursive
The capital "J" in cursive is quite different from its lowercase friend, and it often has a more elaborate, grander look. It doesn't have a dot, for one thing, and its starting point and loops are unique. Many people find it quite a satisfying letter to write once they get the hang of it, too. It's got a certain flair, hasn't it?
The Unique Look of the Big J
Unlike the small "j," the capital "J" usually begins with a loop or a flourish at the top, often starting above the top line. It then sweeps down, often with a generous curve, before looping back up to connect to the next letter. Each style of cursive might have a slightly different way of forming it, but the general idea is a graceful, flowing descent and return. It's a letter that often makes a statement, you know?
Think of it as a decorative element in your writing. It's not just functional; it's also about beauty. Some capital "J"s have a very pronounced loop at the top, while others are a bit more understated. You can even develop your own personal style for it over time, which is pretty neat. It's a letter that allows for a little artistic expression, apparently.
The capital "J" is also often the first letter in a name or a sentence, so making it look good can really set the tone for the rest of your writing. It's worth taking the time to get this letter right, as it can really elevate the overall appearance of your cursive. It's a very visible letter, after all.
How to Form the Capital J
To form the capital "J," you typically start with a small loop or an upward stroke just above the top line. Then, you curve down, often with a graceful sweep, going below the baseline. At the bottom, you'll create a loop that goes to the left, then bring your stroke back up to the right, finishing with a small line that can connect to the next letter. It's a bit more complex than the lowercase, but very rewarding.
Focus on the continuous motion. You want to avoid any sharp angles or breaks in the line. The beauty of the capital "J" comes from its smooth curves and elegant flow. Practice making those big, sweeping motions. It's almost like a dance for your hand, isn't it?
Many video tutorials are available that show exactly how to write the capital "J," and watching someone else form it can be incredibly helpful. You can see the subtle movements of the pen and the exact path it takes. This can make a big difference in how quickly you pick it up, honestly.
Connecting Your J for Fluid Writing
One of the main things about cursive is how letters join together, and the "j" is no different. Knowing how to connect it properly to the letters that come before and after it is key to making your writing look smooth and natural. It's all about that flow, you know?
Joining the Small J
When you finish writing your lowercase "j," the tail that comes up after the loop should be ready to connect to the next letter. This connecting line typically rises to the middle line, or sometimes slightly higher, depending on the letter that follows. For example, if you're writing "jump," the end of your "j" will smoothly lead into the start of the "u." It's a pretty straightforward connection, actually.
Practice writing common words that include the "j" to get a feel for these connections. Words like "jet," "join," or "jam" are good ones to try. Pay attention to how your pen moves from the end of the "j" into the beginning of the next letter, keeping the motion continuous. This really helps with the overall look of your writing, truly.
Sometimes, the trick is to make sure your connecting stroke isn't too short or too long. It needs to be just the right length to comfortably reach the starting point of the next letter without looking stretched or cramped. This comes with practice, of course.
Linking the Capital J
Connecting the capital "J" is a bit different because it usually starts a word. The end of the capital "J" will have a small line or a loop that extends to the right, ready to join the next lowercase letter. For instance, if you're writing "January," the end of your capital "J" will flow right into the "a." This connection should also be smooth and effortless.
Since the capital "J" often has more flourishes, make sure its connecting stroke isn't lost in the decorative parts. It needs to be clear and strong enough to lead directly into the next letter. Practice writing names or place names that begin with "J," like "Jessica" or "Jackson," to get a feel for this. It's a very visible connection, so getting it right matters.
Some styles of capital "J" might have a slightly different connecting point, so it's good to be aware of the style you're trying to learn. Regardless of the style, the goal is always a seamless transition to the next letter, making the word look like one continuous piece of art. This takes a little bit of fine-tuning, you know?
Practice Makes Perfect: Using Worksheets and Resources
The saying "practice makes perfect" really holds true for cursive handwriting, especially for a letter like the "j" that can be a bit difficult to master at first. Luckily, there are tons of helpful resources out there that can make your practice sessions much more effective and even fun. You'll find that using these tools really helps build your confidence.
Finding Free Printable Worksheets
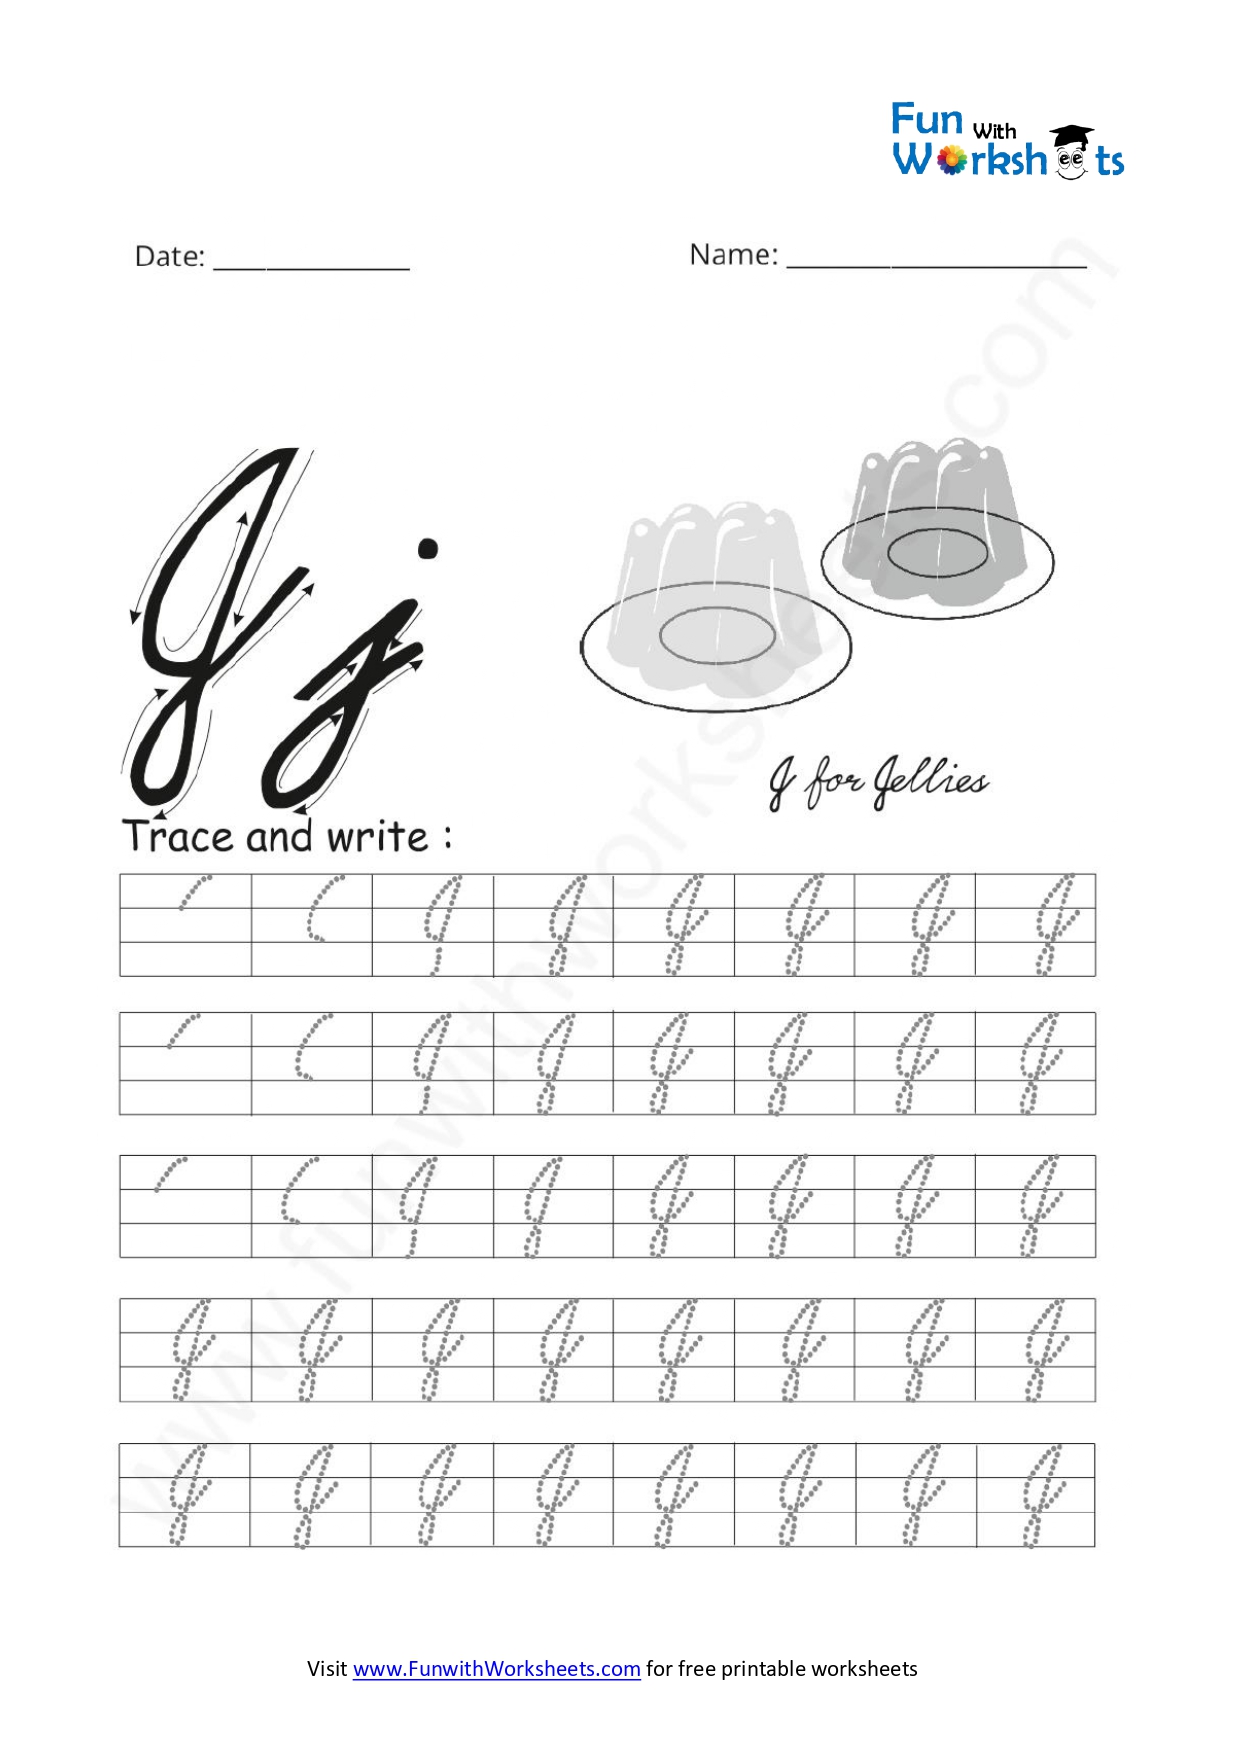
One of the best ways to get good at writing the cursive "j" is by using worksheets. You can find many free printable cursive "j" writing worksheets online. These often include tracing sheets, which are great for getting your hand used to the motion, as well as blank lines for you to practice on your own. There are usually separate sheets for both uppercase and lowercase versions, too.
Many of these worksheets come with cursive letter "j" charts that show you the exact strokes. Some even offer activity pages that make learning more engaging. We have, for example, ten cursive letter "j" worksheets that are all free to download or print, which are really good teaching aids. They help students become more confident in their writing, truly.
Using these printables regularly can help you improve your writing control and fluency. Just dedicating a little bit of time each day to practice on these sheets can lead to noticeable improvements pretty quickly. It's a simple, effective way to get better, honestly.
Watching It Happen with Videos and GIFs
Sometimes, seeing how a letter is formed in real-time can make all the difference. That's why video tutorials and short animated GIFs are so helpful for learning the cursive "j." These visual aids show you the exact path the pen takes, the order of the strokes, and the flow of the letter. It's almost like having a teacher right there with you, isn't it?
You can find video tutorials showing how to write both the lowercase and uppercase cursive "j." There are also short GIFs that loop, showing the writing process over and over, which is great for quick reference. Watching these a few times before you pick up your pen can really help you visualize the process, making it easier when you try it yourself. This is a very helpful tool, actually.
Watching these visuals can help you understand the subtle nuances of the letter, like where to lift your pen or where to apply a bit more pressure. It's a fantastic way to learn by imitation, and it can speed up your progress quite a bit. So, definitely look for these visual guides, too.
Troubleshooting Common Cursive J Hurdles
It's totally normal if the cursive "j" feels a bit difficult to master at first. Many people run into similar small challenges when they're learning it. But don't worry, most of these hurdles have pretty simple fixes that can help you get your "j" looking great. We've got some ideas to help you through, too.
When It Feels a Bit Tricky
One common thing people notice is that their "j" might look a little wobbly, or the loop at the bottom doesn't quite close right. Sometimes, the connecting stroke might feel awkward, or the dot ends up in the wrong place. These are all very common issues, and they're usually just signs that your hand needs a little more practice to get the muscle memory down. It's a process, you know?
Another thing is getting the size and proportion right. Sometimes the loop is too big, or the letter is too tall or too short compared to other letters. This can make your writing look a bit uneven. It's a matter of getting your eye used to the correct proportions, which comes with seeing and practicing the letter often. You'll get there, honestly.
Don't get discouraged if your first few attempts aren't perfect. That's part of the learning process. Just keep trying, and focus on one small improvement at a time. Every little bit of practice helps, truly.
Simple Fixes for Better J's
If your "j" is wobbly, try slowing down your writing a bit. Focus on making each stroke deliberate and controlled. For the loop not closing, make sure your upward stroke crosses the downstroke at the right point and then continues smoothly. For the dot, remember to add it after the main letter is formed, directly above the "j." It's a small detail, but it matters, apparently.
For issues with size and proportion, using lined paper with clear guidelines can be incredibly helpful. Many of the free worksheets we mentioned have these lines built in, which guide you on where the letter should start, where it should go below the line, and how tall it should be. This visual guide can make a big difference in getting your letters consistent. It's a very practical step, actually.
If you're still having trouble, try writing the "j" in the air with your finger a few times before putting pen to paper. This helps your brain and hand coordinate the movement. Sometimes just visualizing the letter's path can make it much easier to write. It's a little trick that often works, you know?
Your Handwriting Journey: Moving Forward
Getting comfortable with the cursive "j" is a really good step in your handwriting journey. You've explored how to form both the lowercase and uppercase versions, picked up tips for smooth strokes, and learned about connecting your letters for a nice flow. Remember that practice is your best friend here, and there are tons of free resources, like worksheets and videos, to help you along the way. It's all about consistent effort, you know?
Keep practicing regularly, even if it's just for a few minutes each day. The more you write, the more natural and effortless your cursive "j" will become. You'll find that your hand starts to remember the movements, and your letters will become more consistent and elegant over time. It's a very rewarding skill to develop, honestly, and one that many people still appreciate today. You can really make your written words stand out.
For more general handwriting tips and resources, you might find a lot of helpful information on various handwriting resources online. You can also learn more about other cursive letters on our site, and find more free practice sheets on our dedicated worksheets page. Keep writing, and enjoy the beauty of your evolving cursive!
Frequently Asked Questions About Cursive J
People often have questions when they're learning to write the cursive "j." Here are some common ones that come up.
Is the cursive J hard to write?
Some people find the cursive "j" a bit challenging at first, mainly because of its unique loop below the line and its specific connecting points. However, with consistent practice and the right guidance, it becomes much easier. It's like learning any new skill; it just takes a little bit of time and effort, you know?
How do you connect a cursive J?
For the lowercase "j," the tail that comes up after the loop below the line connects directly to the next letter. For the capital "J," a small line or loop at the end of its main stroke extends to the right to join the following lowercase letter. The key is to make these connections smooth and continuous, so the word flows together. It's all about that seamless transition, really.
Are there free worksheets for cursive J?
Yes, absolutely! There are many free printable cursive "j" worksheets available online. These often include tracing exercises, practice lines, and charts for both uppercase and lowercase versions. You can download and print them to help you practice and improve your cursive "j" handwriting. They're a very helpful resource, honestly.

Uppercase J Cursive

Cursive 'J' worksheets to practice capital, upper and lowercase letter
Capital Letter J
