How To Tie A Nice Bow With Ribbon: Simple Steps For A Polished Look
Learning how to tie a really pleasing bow with ribbon can feel like a secret skill, yet it's something anyone can pick up. Whether you are wrapping up a thoughtful present, adding a charming touch to a craft project, or just brightening up your home decor, a well-tied bow makes a big difference. It's that little bit of extra care that really shows. You might have seen professional gift wrappers create those absolutely perfect bows and wondered how they do it. Well, it's not magic, just a few simple steps and perhaps a bit of practice.
From decorating a Christmas tree to making a simple gift look extra special, the appeal of a lovely bow is quite strong. There's a sort of satisfaction that comes from creating something so neat and pretty with your own hands, isn't there? It’s a very simple yet elegant way to add a bit of sparkle to so many things. This year, it's almost like everyone is rediscovering the joy of the bow, too. It seems to be a rather popular trend for decorations and gifts, and getting involved couldn't be easier or more affordable, actually.
You know, tying a bow with ribbon is, in a way, an essential skill for anyone who enjoys making beautiful things, or wrapping presents, or even just decorating their living space. It doesn't matter if you're just starting out with crafts or if you've been doing them for years; learning how to tie a bow that looks just right can take a little bit of time and patience. We're here to show you how to do just that, giving you some really helpful ways to make those pretty ribbon bows for all your needs, without needing any special tools at all.
Table of Contents
- Why a Great Bow Matters
- Getting Ready: Your Bow-Tying Essentials
- The Classic "Shoe-Lace" Bow Method
- The Layered or Double Bow: For Extra Fullness
- The Simple Loop Bow: A Florist Favorite
- The Fork Bow: For Delicate Touches
- The Wrap-Around Gift Bow: For a Polished Package
- Tips for a Truly Perfect Bow
- Troubleshooting Common Bow-Tying Issues
- Frequently Asked Questions About Tying Ribbon Bows
Why a Great Bow Matters
A well-made bow, you know, it just adds that special something to so many things. Think about it: a gift wrapped with a really neat bow feels more thoughtful, doesn't it? Or a craft project, maybe a handmade card or a scrapbook page, gets a bit of extra flair with a pretty ribbon accent. It's a simple way to decorate, to embellish, or to add a bit of charm to anything you are working on. Whether it's for those really special moments or just for your everyday creative fun, learning how to tie a bow that looks just right can truly make a difference.
Mastering the way to tie a gorgeous, thin ribbon bow, for instance, can add a pop of color to your creations. A thin ribbon bow, in a way, has the ability to make any gift, any craft piece, or any decorative item feel more special with its delicate and charming presence. Bows made from ribbon can be created in several ways, depending on what you plan to use them for. They are very versatile, you see, and can be used for so many different purposes, from decorating a package to adding a lovely touch to clothing.
Getting Ready: Your Bow-Tying Essentials
Before you even begin to tie your bow, you will want to gather a few simple things. Really, all you need is some ribbon and a good pair of scissors. The type of ribbon you pick can make a big difference in how your bow turns out, too. Wider ribbons often create a more dramatic, fuller bow, while thinner ribbons are great for delicate touches or for making smaller bows, perhaps for cards or hair clips. You might also consider the material of the ribbon; some materials, like satin, are a bit more slippery, while others, like grosgrain, hold their shape quite well. It's good to have your ribbon cut to a generous length, as you can always trim it shorter later on.
The Classic "Shoe-Lace" Bow Method
This is probably the most common way people tie bows, and it's pretty much like tying your shoelaces, actually. It's a great starting point for anyone wanting to learn how to tie a nice bow with ribbon. This method gives you a simple, elegant bow that works well for many different uses, from gifts to hair accessories. It's a technique that, with a little bit of practice, you can get just right, and it forms a really balanced and pleasing shape. This is often the first bow-tying skill people learn, and for good reason, it's very adaptable.
Step-by-Step: Classic Bow
Start with your ribbon: Take your ribbon and place it around whatever you are decorating, or just hold it in your hands if you are making a standalone bow. You want to make sure you have enough length on both sides to create your loops. For a gift, you might wrap it around the package, bringing the two ends together at the top or front. So, you'll have two ends, one in each hand, more or less.
Make the first crossover: Take the right side of the ribbon and cross it over the left side. Then, you will bring that right side underneath the left side and pull it through the opening you just created. This forms the first part of your knot, kind of like when you start tying a shoelace. Pull it snug, but not so tight that you crush your gift or object, just enough to secure it.
Form the first loop: Now, take one of the ribbon ends and fold it back on itself to create a loop. This will be one side of your bow. Hold this loop firmly between your thumb and forefinger. You want this loop to be a good size, not too small, not too big, just right for the look you are going for, you know?
Bring the other end around: Take the other ribbon end and bring it over the top of the loop you just made. Then, you will thread it through the opening that forms underneath the first loop. This is where it really starts to look like a bow. You are essentially making a second loop that goes through the first one. It's a bit like creating a second bunny ear on your shoelace, really.
Pull to tighten and adjust: Gently pull both loops at the same time. As you pull, the knot will tighten, and your bow will begin to take shape. You can then carefully adjust the size of the loops and the "tails" of the ribbon until your bow looks balanced and pleasing. You might need to tug one loop a little more, or pull a tail a bit, until it's just right. This part often takes a moment or two to get perfect, but it's very rewarding.
Trim the ends: Once your bow is tied and adjusted, you can trim the ends of the ribbon. Cutting them at an angle or creating a "V" shape can give your bow a more finished and professional appearance. This really helps to make it look neat and tidy, too.
The Layered or Double Bow: For Extra Fullness
Sometimes, a single bow just doesn't quite have the impact you are hoping for, especially if you are using a thinner ribbon or want a really luxurious look. That's where the layered or double bow comes in. This method gives you a much fuller, more substantial bow, adding depth and a feeling of abundance. It's a great choice for larger gifts, wreaths, or when you just want a more dramatic decorative element. It's surprisingly simple to create, and the effect is quite striking, honestly.
How to Make a Layered Bow
Start with two lengths of ribbon: For a layered bow, you will want two pieces of ribbon. They can be the same color and width for a fuller version of the classic bow, or you can use two different ribbons – perhaps one wider and one narrower, or two different colors – for a more interesting effect. You might choose a wider, solid color ribbon for the bottom layer and a narrower, patterned one for the top, for example. Just make sure they are long enough for your desired bow size.
Layer the ribbons: Place the narrower ribbon directly on top of the wider ribbon, making sure they are aligned. You will essentially treat these two ribbons as one single piece as you tie your bow. This is a very simple step, but it's important to keep them together as you go through the next steps, you know.
Tie a classic bow: Now, simply follow the steps for the classic "shoe-lace" bow method described above, treating the layered ribbons as one. Cross them over, make your first knot, then form your loops, and pull them through. The key here is to keep the two ribbons together as much as possible throughout the process. It might take a little bit of extra care to keep them from twisting, but it's worth it.
Adjust and fluff: Once your bow is tied, gently separate the loops of the two ribbons. You can pull them apart slightly to create more volume and make the bow look even fuller. This is where the "layered" effect really shines. You can also adjust the tails and loops just like with a single bow, making sure everything looks balanced and pleasing. It's almost like you are fluffing it up, really.
Trim the ends: As always, trim the ends of both ribbons to your preferred length and style. This helps to give your layered bow a really neat and professional appearance, which is pretty important for that finished look.
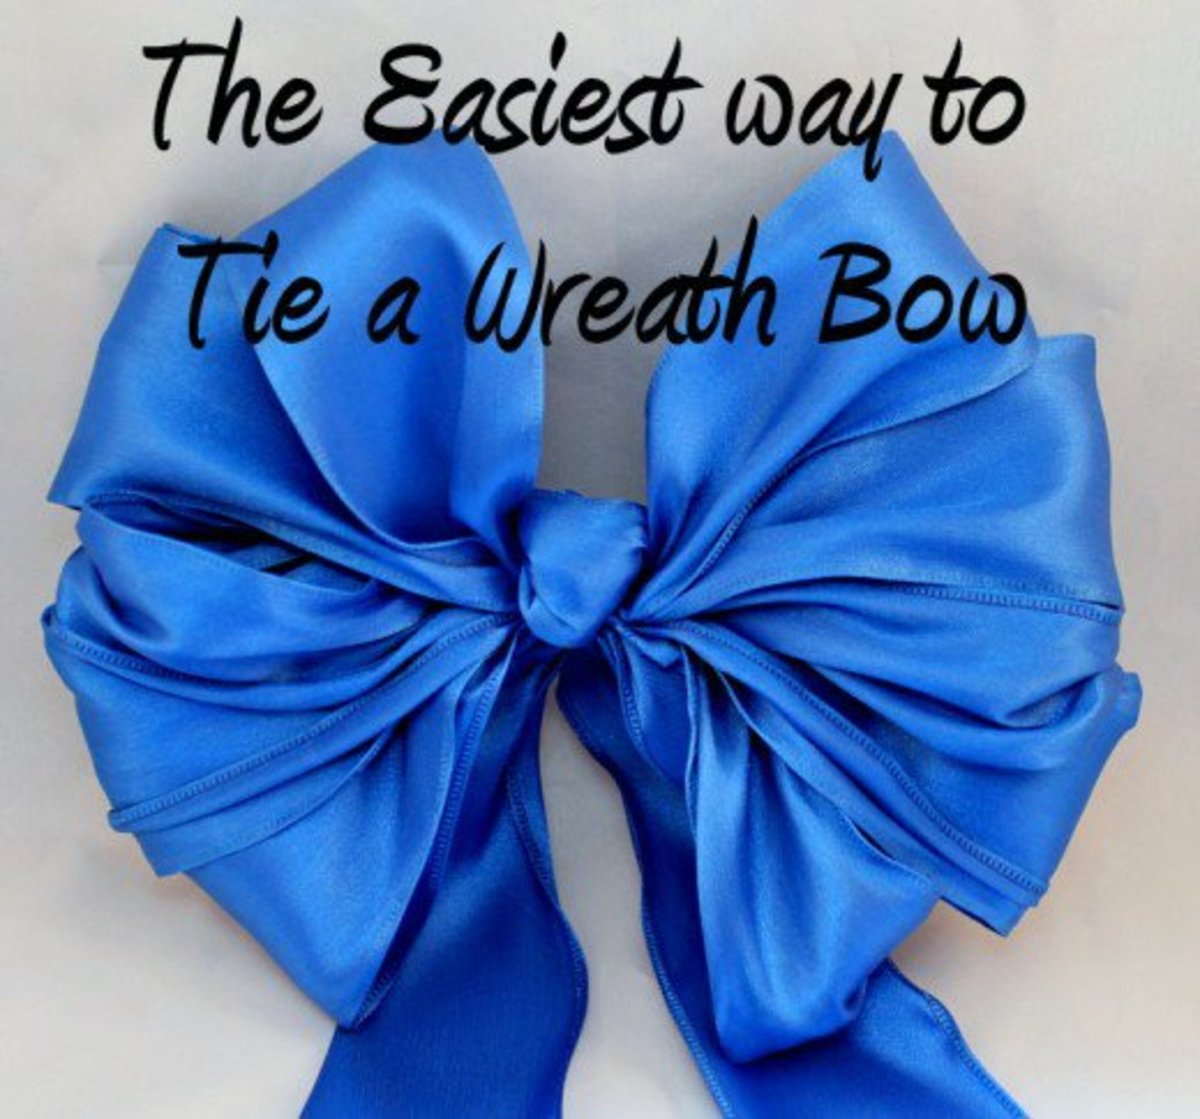
The Simple Loop Bow: A Florist Favorite
This type of bow, often used by florists, creates a very full, rounded look with multiple loops, giving a very lush and luxurious feel. It's a bit different from the classic bow because it involves making several loops before securing them, rather than just two. This method is great for adding a lot of volume and visual interest to gifts, wreaths, or even flower arrangements. It's a way to make a bow that really stands out and has a lot of presence, too. You can use various widths of ribbon for this, but a medium to wider ribbon often works best.
Creating a Loop Bow
Measure your ribbon: You will need a good length of ribbon for this, as you'll be making multiple loops. The longer the ribbon, the more loops you can create, resulting in a fuller bow. It's better to have too much than too little, honestly, as you can always trim the excess.
Form the first loop: Hold one end of the ribbon in your non-dominant hand. With your dominant hand, create a loop, bringing the ribbon back towards your thumb. This will be the first loop of your bow. You want this loop to be a decent size, as it will set the scale for the rest of your loops. Hold it firmly at the base.
Create more loops: Continue making loops, folding the ribbon back and forth, always gathering them at the center point where you are holding the first loop. You can make as many loops as you like, alternating sides, until your bow reaches the desired fullness. Each loop should be roughly the same size for a balanced look. So, you might make two loops on one side, then two on the other, and so on.
Secure the center: Once you have all your loops, pinch them tightly in the center. Take a separate, smaller piece of ribbon, or even a piece of floral wire, and wrap it tightly around the pinched center of your loops. Tie it off securely at the back. This is what holds all your loops together. It's very important that this is tight, you know, to keep the bow from falling apart.
Fluff and shape: Now for the fun part! Gently pull and separate each loop, fluffing them out to create a full, rounded bow. You can twist some loops, or pull others forward, to give your bow a really pleasing, three-dimensional shape. This is where you really give the bow its character. It's almost like you are coaxing it into its final form.
Trim the tails: Finally, trim any excess ribbon from the securing piece, and shape the ends of your main ribbon tails. You can leave them long or trim them shorter, depending on your preference. Cutting them at an angle or a "V" shape can add a nice finishing touch, too.
The Fork Bow: For Delicate Touches
When you need a really tiny, delicate bow, perhaps for a card, a small craft project, or even a doll's outfit, the fork bow method is quite clever. This technique uses the tines of a fork to help you create perfectly petite bows with thin ribbon. It's a bit of a trick, but it works surprisingly well, especially for those times when your fingers just feel too big for the job. This is a very useful skill to have, particularly if you work with very fine ribbons, you know?
Making a Fork Bow
Get your materials: You will need a fork (a standard dinner fork works well), a thin ribbon (about 1/8 to 1/4 inch wide is ideal), and a pair of small, sharp scissors. A thinner ribbon is pretty much essential for this method to work properly.
Wrap the ribbon: Take one end of your ribbon and hold it against the back of the fork, running it perpendicular to the tines. Now, bring the other end of the ribbon over the top of the fork, between the two middle tines, and then around to the back. You are essentially wrapping the ribbon around the two middle tines, creating a loop on the front side. Make sure it's snug, but not too tight, as you'll need to work with it.
Make the first crossover: Bring the ribbon end that is at the back of the fork up through the gap between the two middle tines, over the top of the loop you just made. So, it comes from the back, through the middle, and over the front loop, you see.
Form the second loop: Now, take that same ribbon end and thread it underneath the first loop you created, coming out on the other side. This is where you are essentially tying a tiny knot, using the fork as your guide. It's a bit fiddly, but it really does create a neat little knot in the middle.
Pull to tighten: Gently pull both ends of the ribbon. As you pull, a tiny bow will form on the front of the fork. Keep pulling until the knot is snug and the bow looks neat. It's important to pull evenly on both sides to get a balanced shape, more or less.
Slide off and trim: Carefully slide the completed bow off the tines of the fork. You might need to give it a little wiggle. Once it's off, trim the tails to your desired length. You can cut them straight, at an angle, or create a little "V" shape for a polished look. This method is very handy for consistently making really small, uniform bows.
The Wrap-Around Gift Bow: For a Polished Package
This method is perfect for gifts, as it secures the ribbon around the package while also creating a beautiful bow on top. It's the kind of bow that makes a gift look truly professional and thoughtfully presented. It's a bit different from just tying a bow and sticking it on; this one becomes an integral part of the wrapping itself. Many professional gift wrappers use variations of this technique to achieve that really polished appearance, and it's something you can certainly learn to do too, with a little practice.
Steps for a Wrap-Around Bow
Position the ribbon: Start by placing your gift box face down. Lay your ribbon across the back of the box, centered. Bring the two ends up to the front of the box. You want to make sure you have plenty of ribbon for the bow itself, so leave generous tails. This is pretty important for a good-looking bow, you know.
Cross and secure: Cross the two ribbon ends over each other on the front of the box. Then, take one end and thread it underneath the ribbon that is already running along the width of the box. Pull it snug, so the ribbon is tight around the package. This secures the ribbon in place and forms the base for your bow. It's a simple crossover, but it's very effective.
Make the first knot: Bring the two ends up again and tie a simple knot, just like the first step of tying a shoelace (right over left, then under and through). Pull this knot snug against the box. This creates the foundation for your bow, and it's where the bow will sit on the package. You want it to be firm, but not so tight it squishes the box.
Tie the bow: Now, using the two ends of the ribbon that are coming from your knot, tie a classic "shoe-lace" bow directly on top of the knot you just made. Follow the steps for the classic bow method: make one loop, bring the other end around and through, then pull both loops to tighten. Take your time to make sure the loops are even and the tails are balanced. It's almost like you're building the bow right on the package.
Adjust and trim: Once your bow is tied, gently adjust the loops and tails until they look just right. You can fluff them up, pull them a little tighter, or loosen them a bit until you are happy with the shape. Finally, trim the ends of the ribbon. Cutting them at an angle or a "V" shape will give your gift a really neat and finished look. This final touch makes a big difference, honestly.
Tips for a Truly Perfect Bow
Getting a bow to look just right can take a little bit of practice, but there are some simple things you can do to make it easier and get better results every time. These little secrets, as some might call them, can really help you achieve that professional, polished look. You know, it's often the small details that make the biggest difference, and with bows, that's certainly true. So, here are some things to keep in mind, which are very helpful.
Choose the right ribbon: The type of ribbon really matters. Wired ribbon is fantastic because it holds its shape beautifully, allowing you to mold and fluff your loops easily. Satin ribbons are elegant but can be a bit more slippery to work with, while grosgrain offers a nice texture and holds knots well. Consider the occasion and the item you are decorating, too. A wider ribbon often makes a more dramatic statement, while a thinner one is perfect for delicate touches. Sometimes, a sheer ribbon can add a lovely, ethereal quality.
Cut generous lengths: It's always better to start with more ribbon than you think you will need. You can always trim off the excess, but you can't add more if you cut it too short. Having a bit of extra length gives you room to adjust, re-tie if needed, and create those lovely long tails. This is pretty much a golden rule for any ribbon project, actually.
Practice makes perfect: Just like learning any new skill, tying bows gets easier and better with practice. Don't get discouraged if your first few bows aren't exactly what you envisioned. Keep trying, and you'll quickly get a feel for how the ribbon behaves and how much tension to apply. You might even find it relaxing after a while, you know?
Adjust as you go: Don't just tie the knot and walk away. Once the bow is formed, gently pull on the loops and tails to adjust their size and position. You can make the loops fuller, the tails longer, or just ensure everything is symmetrical. This fine-tuning step is very important for a truly polished bow. It's almost like sculpting it into its final form.
Consider the ends: How you cut the ends of your ribbon can really elevate the look of your bow. Cutting them at a sharp angle or creating a "V" shape (also called a dovetail) prevents fraying and gives a professional finish. Some people even use pinking shears for a decorative edge. This simple detail can make a big impact on the overall appearance, honestly.
Use a separate piece for securing (for multi-loop bows): For fuller bows with many loops, like the florist bow, using a separate, thinner piece of ribbon or floral wire to secure the center can make a huge difference. It allows you to create all your loops without worrying about tying them directly, and then you just cinch them all together. This makes the process much simpler and often results in a neater center, too.
Work on a flat surface: When possible, work on a flat, stable surface. This gives you a good foundation and makes it easier to manage the ribbon, especially if you are working with longer lengths or multiple layers. It helps keep things from getting tangled, you know?
Keep it symmetrical: For most bows, symmetry is key to a pleasing look. Try to make your loops the same size and your tails the same length. While some artistic bows might intentionally be asymmetrical, for a classic, nice bow, balance is pretty important.
Don't over-tighten:
How To Tie A Bow Tie With Ribbon | tunersread.com

How to tie a bow with ribbon how to tie the perfect bow never do it
How To Tie A Neat Ribbon Bow at Kayla Omay blog
