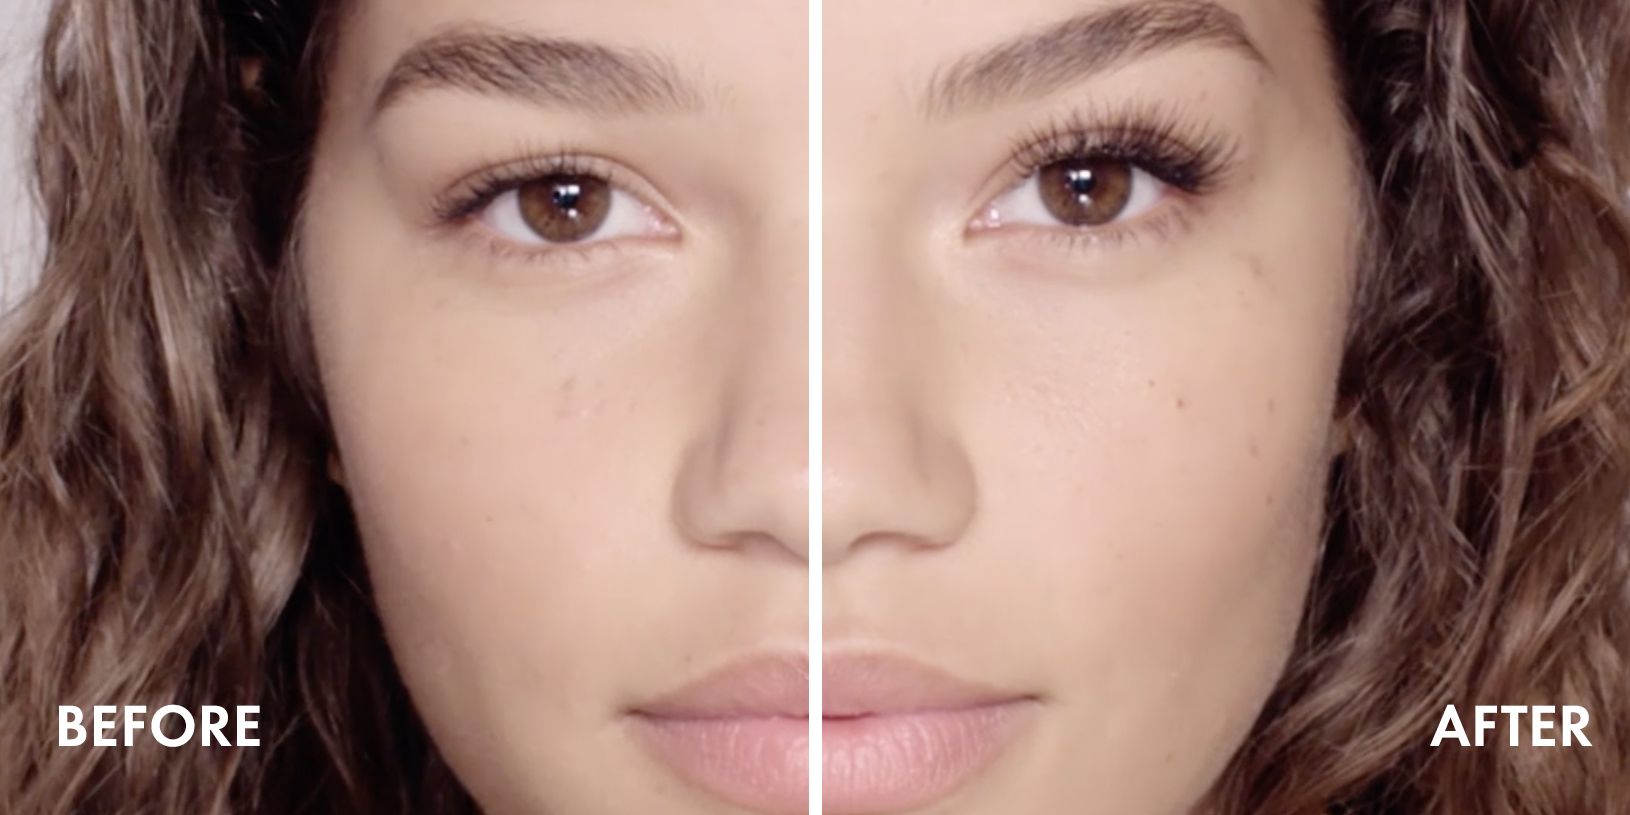
Getting Your Gaze Ready: How To Put On False Lashes Like A Pro
Putting on false lashes can seem a bit tricky at first, you know? It’s a skill many people want to pick up, and for good reason. A pair of well-placed false lashes can really make your eyes pop, adding a lovely fullness and a touch of glamour that mascara alone might not quite give you. It’s almost like a little secret weapon for a truly striking look, whether you are going out for a special event or just want to feel a bit more polished on a regular day.
Many folks wonder if it’s hard to put on false lashes, and the truth is, it just takes a little practice. Think of it like learning any new skill, like tying a knot or, you know, getting a new recipe just right. Once you get the hang of it, the process becomes much simpler, and you’ll be able to get those lovely fringes in place with ease. We are going to walk through each step, making it easy to follow along.
This guide will help you understand the whole process, from picking the right pair to making them stay put all day. We’ll cover what you need to do before putting them on, and how to make sure they look natural and feel comfortable. So, if you've been curious about adding this beauty trick to your routine, today, in early June 2024, is a great time to learn all about it.
Table of Contents
- What You'll Need: Your Lash Application Toolkit
- Prepping Your Natural Lashes
- Measuring and Trimming Your False Lashes
- Applying the Lash Adhesive
- Placing the False Lash Just Right
- Securing and Blending Your Lashes
- Solving Common Lash Application Issues
- Taking Care of Your False Lashes
- Frequently Asked Questions About False Lashes
What You'll Need: Your Lash Application Toolkit
Before you even think about putting on false lashes, it’s really helpful to have all your tools ready. This makes the whole process smoother, you know, without you having to scramble for things mid-application. Having everything laid out means you can focus on the delicate task at hand.
False Lashes: There are so many kinds out there. You can find natural-looking ones, or really dramatic ones. Pick a style that suits the occasion or the look you are going for. Some people prefer strip lashes, while others like individual clusters.
The type you choose can make a difference in how they feel and look. For beginners, a lighter, more natural strip lash is often a good starting point. They are, in a way, easier to handle.
Lash Adhesive (Glue): This is pretty much the most important thing. You want a good quality lash glue that dries clear and holds well. There are different types, like black glue for a more defined look or clear glue for a seamless finish. Make sure it’s fresh, too, as old glue can lose its stickiness.
Some glues come with a brush applicator, which can make it a bit easier to apply a fine line. Others come in a tube, and you might need a separate tool for that. This is what helps you put the lash right onto your eyelid.
Tweezers or Lash Applicator Tool: While some people use their fingers, a specialized tool or a good pair of tweezers gives you much more control. They help you pick up the lash and place it precisely. A lash applicator tool is often curved, making it easier to hold the lash in the right shape.
This tool helps you to, you know, really get a grip on the lash band without bending it. It’s a very handy item to have.
Small Scissors: These are for trimming the lashes if they are too long for your eye shape. Nail scissors or tiny craft scissors work perfectly. You want something with a fine, sharp blade for a clean cut.
Cutting them to fit is a really important step. If they are too long, they can poke your inner or outer corners, which is not comfortable at all.
Mascara (Optional): You might want to apply a light coat of mascara to your natural lashes before or after applying the false ones. This helps them blend together. A waterproof mascara can be a good choice, too, as it won't smudge.
Blending is key for a natural look, you know. It makes it seem like the false lashes are just part of your own beautiful fringe.
Eyeliner (Optional): A thin line of liquid or gel eyeliner can help hide the lash band and make the false lashes look more integrated. It also adds a bit more definition to your eye. Some people like to put this on before the lashes.
This step just, you know, tidies everything up and makes the lash line appear seamless.
Prepping Your Natural Lashes
Getting your own lashes ready is a crucial first step. It helps the false lashes stick better and look more natural. Think of it as preparing the surface for what you are about to put on.
First, make sure your eyelids and natural lashes are clean. Any leftover makeup or oil can make the glue not stick as well. You want a clean, dry base for the best hold. A quick wipe with a gentle, oil-free makeup remover can do the trick.
Next, you might want to curl your natural lashes. Use an eyelash curler to give them a nice lift. This helps them blend with the curve of the false lashes. If your natural lashes are straight, the false ones might sit oddly on top without this step.
After curling, apply a light coat of mascara to your natural lashes. This gives the false lashes something to rest on and helps create a more unified look. It also makes your own lashes a bit more visible, which is good for blending. Don't go too heavy, though, just a light layer is enough.
Measuring and Trimming Your False Lashes
This step is often overlooked, but it's really important for comfort and a natural look. Most false lashes come in a standard length, which might be too long for your specific eye shape. You are, in a way, customizing them to fit you perfectly.
Carefully remove one false lash from its tray using your tweezers or applicator. Be gentle so you don't bend or damage the delicate lash band. Hold it up to your eye, without any glue, to measure its length. Place the lash band along your natural lash line, starting from the inner corner and extending to the outer corner.
See how much excess length there is at the outer corner. You typically want the false lash to end just a little before your natural lash line ends, or exactly where it ends. If it goes too far out, it can feel uncomfortable and look unnatural, almost like it's dragging your eye down.
Using your small scissors, carefully trim the excess from the outer corner of the lash band. Never trim from the inner corner, as that part is usually designed to be shorter and more comfortable near your tear duct. Make sure to cut off just a tiny bit at a time, you know, a little snip here and there, until you get the right length. You can always cut more, but you can't put it back!
Once you've trimmed one lash, use it as a guide for the other. This helps ensure both lashes are the same length, which is pretty important for a balanced look. This custom fitting helps them sit just right.
Applying the Lash Adhesive
This is where the magic happens, but it also requires a bit of patience. Applying the right amount of glue and letting it get tacky is key to successful application. You want to put the glue on the lash band itself, not directly on your eyelid.
Take your trimmed false lash and hold it with your tweezers or applicator. Apply a very thin, even line of lash adhesive along the entire lash band. Make sure to get a little extra glue on the very ends of the band, both the inner and outer corners. These are the spots that tend to lift first, you know, if not enough glue is there.
Now, this is the really important part: wait for the glue to get tacky. Don't apply the lash immediately after putting on the glue. Most glues need about 30 to 60 seconds to become sticky enough to hold, but not so wet that they slide around. You'll notice the glue might change color slightly or become less shiny. It’s almost like waiting for paint to dry just enough to be sticky.
This waiting period is pretty crucial. If you apply the lash when the glue is too wet, it will slide around and make a mess. If you wait too long and the glue dries completely, it won't stick at all. So, you know, find that sweet spot for your specific glue. Some people even blow on the lash band gently to help it along.
Placing the False Lash Just Right
With the glue now tacky, it's time to put the lash onto your eyelid. This step requires a steady hand and a bit of focus. You are, in a way, placing a delicate piece of art onto a very specific spot.
Look down into a mirror. This angle helps you see your lash line clearly. Using your tweezers or applicator, hold the false lash from the center. You want to bring the lash band as close as possible to your natural lash line. Aim to place it right on top of your natural lashes, not on your eyelid skin above them, and definitely not on your actual lashes.
Start by placing the center of the lash band first. Once the middle is gently touching your lash line, then adjust the outer corner. Gently press the outer corner down onto your lash line. Then, do the same for the inner corner. It's like anchoring the lash in three points, you know, center, outer, then inner.
Take your time with this. If it's not quite right, you can gently lift it and reposition it while the glue is still tacky. Don't pull too hard, just a gentle adjustment. The goal is to have the false lash sitting perfectly aligned with your natural lash line, with no gaps or lifting at the ends.
Securing and Blending Your Lashes
Once the lash is in place, you want to make sure it's secure and looks like part of your own lashes. This final touch makes all the difference in achieving a natural and long-lasting look.
After you have placed the lash, use your tweezers or the back of your lash applicator to gently press the false lash band down onto your natural lash line. Pay special attention to the inner and outer corners, as these are the areas that tend to lift throughout the day. A gentle press along the entire band helps to really bond it to your skin.
You can also use your fingers to gently pinch your natural lashes and the false lashes together. This helps to marry them, you know, so they look like one continuous set of beautiful lashes. This step is pretty effective for blending.
If you want, apply a thin line of liquid or gel eyeliner along your upper lash line, right over the lash band. This helps to hide any visible glue or the edge of the lash band, making the false lashes look even more seamless. It’s a great way to just, you know, tidy up the look.
Finally, if you applied mascara before, you might want to add another light coat now, gently wiggling the brush through both your natural and false lashes. This helps to further blend them and adds extra volume. Be careful not to apply too much, as heavy mascara can sometimes weigh down false lashes or make them look clumpy. Some people prefer not to put mascara on their false lashes at all, to help them last longer.
Solving Common Lash Application Issues
Even with practice, you might run into a few common problems when trying to put on false lashes. Don't worry, these are usually easy to fix, and knowing what to do can save you a lot of frustration. It’s almost like troubleshooting a little puzzle, you know?
Lashes Lifting at the Corners: This is a very common issue. It usually means you didn't apply enough glue to the ends of the lash band, or you didn't let the glue get tacky enough. The fix? Gently peel back the lifting part, apply a tiny dot of fresh glue to that specific spot, wait a few seconds for it to get tacky, and then press it back down firmly. You really want to put that little bit of extra adhesive right where it's needed.
Lashes Not Sticking at All: If the lash just won't stick, the glue might be too wet or too dry. If it's too wet, it will slide. If it's too dry, it won't adhere. Remove the lash, wipe off the old glue (if it's dry), apply a fresh line of glue, and be more precise with your waiting time. Remember that tacky stage is pretty important.
Lashes Feeling Uncomfortable or Pokey: This often happens if the lashes are too long for your eye, or if the inner corner is poking you. Go back to the trimming step. Remove the lash, and carefully trim a tiny bit more from the outer corner. If the inner corner feels sharp, you can try to soften it by gently rubbing it between your fingers or using a tiny bit of clear nail polish on the very tip to smooth it out. You want to feel comfortable, you know?
Lashes Looking Unnatural or Too Straight: This can be due to not curling your natural lashes enough, or the false lashes themselves being too straight. Try curling your natural lashes more. You can also gently curve the false lash band into a "C" shape a few times before applying glue; this helps it mold to your eye's natural curve. It's almost like giving it a little pre-bend.
Glue Showing: If you see visible glue, you might have applied too much, or it hasn't dried clear. If it's clear glue, give it more time to dry. If it's black glue, or if it's still visible, a thin line of black liquid eyeliner applied over the lash band can easily cover it up. This just, you know, makes everything look clean.
Taking Care of Your False Lashes
To make your false lashes last for multiple uses, proper care is pretty important. Just like any other beauty item, a little cleaning and careful storage can extend their life. You want to, you know, keep them in good shape.
When you are ready to remove your lashes, do it gently. Start by applying an oil-based makeup remover to a cotton swab and gently dab it along your lash line where the glue is. Let it sit for about 30 seconds to loosen the adhesive. Then, starting from the outer corner, gently peel the lash band away from your eyelid. Never pull or yank, as this can damage your natural lashes and the false ones.
Once removed, you need to clean them. Carefully peel off any leftover glue from the lash band. You can use your tweezers for this. Then, place the lashes on a clean paper towel. Dip a cotton swab in oil-free makeup remover or rubbing alcohol and gently swipe it along the lash hairs to remove any mascara or eyeliner residue. Be very gentle, as the hairs are delicate.
After cleaning, let them air dry completely. Once dry, place them back in their original tray or a special lash case. This helps them keep their shape and protects them from dust and damage. Storing them flat is, you know, a good way to maintain their curve.
With good care, a single pair of false lashes can be used many times, saving you money and making your beauty routine more sustainable. It's almost like getting a fresh start with them each time you put them on.
Frequently Asked Questions About False Lashes
Many people have questions when they are first learning how to put on false lashes. Here are some common ones that come up, you know, from what people often ask.
Is it hard to put on false lashes?
It can feel a little challenging at first, but it's really a skill that gets much easier with practice. The first few times might take a bit longer, and you might not get them perfectly aligned. But, you know, with each attempt, you'll get better at handling the tools and placing the lashes. It’s almost like learning to ride a bike; you might wobble at first, but soon you'll be zipping along. Just keep trying, and you'll get the hang of it.
What do you put on before false lashes?
Before putting on false lashes, you should make sure your eyelids and natural lashes are clean and dry. Many people curl their natural lashes first to help them blend better with the false ones. Then, a light coat of mascara on your natural lashes can help create a base for the false lashes to sit on and also helps with blending. So, clean, curled, and a touch of mascara, you know, is the usual routine.
How do you put on false lashes for beginners?
For beginners, the key is patience and starting with the right tools and lashes. Choose a lighter, more natural-looking strip lash. Make sure you have good lash glue that dries clear, and a lash applicator or tweezers for precise placement. The steps involve measuring and trimming the lash, applying a thin line of glue and waiting for it to get tacky, then placing the lash gently from the center outwards, right on your lash line. Remember to press the ends down. It’s a process, but, you know, it’s very doable.
So, getting your lashes on just right takes a little practice, you know? But with these steps, you can totally make it happen. Why not give it a try today and see how your look transforms? Learn more about on our site, and link to this page
Makeup Tutorial No False Lashes - Bios Pics

Can You Put False Lashes On Lash Extensions? - Luxe Luminous
First time trying false lashes. OMG are they hard to put on lol | Scrolller
