How To Fill Nail Holes In Trim For A Flawless Finish
Giving your home's interior a fresh, polished look often means paying attention to the details, and that definitely includes your trim. Those tiny nail holes, left behind from installation or maybe a past project, can really stand out once you start painting, you know? They break up the smooth surface, making everything look just a little less finished than you might want. So, getting rid of them is a pretty big step in making your walls and trim appear truly complete.
You might be thinking about painting your baseboards, door frames, or window casings, and suddenly, there they are: small marks dotting the surface. These little openings, arguably, are a common sight in many homes, and dealing with them properly before you add a fresh coat of color makes all the difference. It's almost like completing a picture; you need to make sure every part is ready for its final presentation.
This guide is here to help you get that perfectly smooth trim, making those little imperfections vanish. We'll walk through the process of how to fill nail holes in trim, so your painting project can result in a truly impressive, professional-looking outcome. It's actually a straightforward task once you know the right approach, and it truly makes a big visual impact.
Table of Contents
- Getting Ready: Materials and Tools
- Step-by-Step: How to Fill Nail Holes in Trim
- Tips for a Great Outcome
- Frequently Asked Questions About Filling Nail Holes
Getting Ready: Materials and Tools
Before you start putting anything into those tiny openings, it's pretty important to gather all your supplies. Having everything at hand means you won't have to stop halfway through, which, you know, can really break your rhythm. The right materials will make sure your repairs hold up and look their best, so choosing wisely is key.
Choosing the Right Filler
When it comes to filling nail holes, you have a few good options, and the best choice often depends on the size of the hole and what kind of trim you're working with. For most standard nail holes in interior trim, a spackle or wood filler will work very well. You want something that dries hard, can be sanded smooth, and will accept paint without any trouble.
Lightweight Spackle: This material is excellent for very small nail holes, like those from finishing nails. It's easy to apply, dries rather quickly, and sands away with little effort. It's a good choice for quick touch-ups on painted trim. Just be aware that it might not be the best for larger gaps or areas that see a lot of wear.
Wood Putty/Wood Filler: For slightly bigger nail holes, or if you're working with natural wood trim that you plan to stain, wood filler is often a better option. It's more durable than spackle and can mimic the texture of wood when dry. Some types are stainable, which is quite useful if you're not painting. Always check the product label to make sure it's suitable for your specific needs, particularly if staining is in your plans.
Painter's Caulk: While not ideal for filling deep holes, a small bead of paintable caulk can be used to seal tiny gaps along the edges of trim where it meets the wall, or to fill very fine hairline cracks. It's flexible, which is a nice benefit for areas that might experience a little movement. You wouldn't use this for actual nail holes that need structural filling, but it's a good companion product for a complete trim refresh.
For this project, focusing on how to fill nail holes in trim, we'll mostly talk about lightweight spackle or wood filler. These are, in a way, your go-to materials for achieving that seamless look.
Essential Tools You'll Need
Having the right tools makes the job much easier and helps you get a cleaner result. You don't need a huge collection of specialized items, but a few basics will be really helpful. So, before you start, make sure you have these items ready to go.
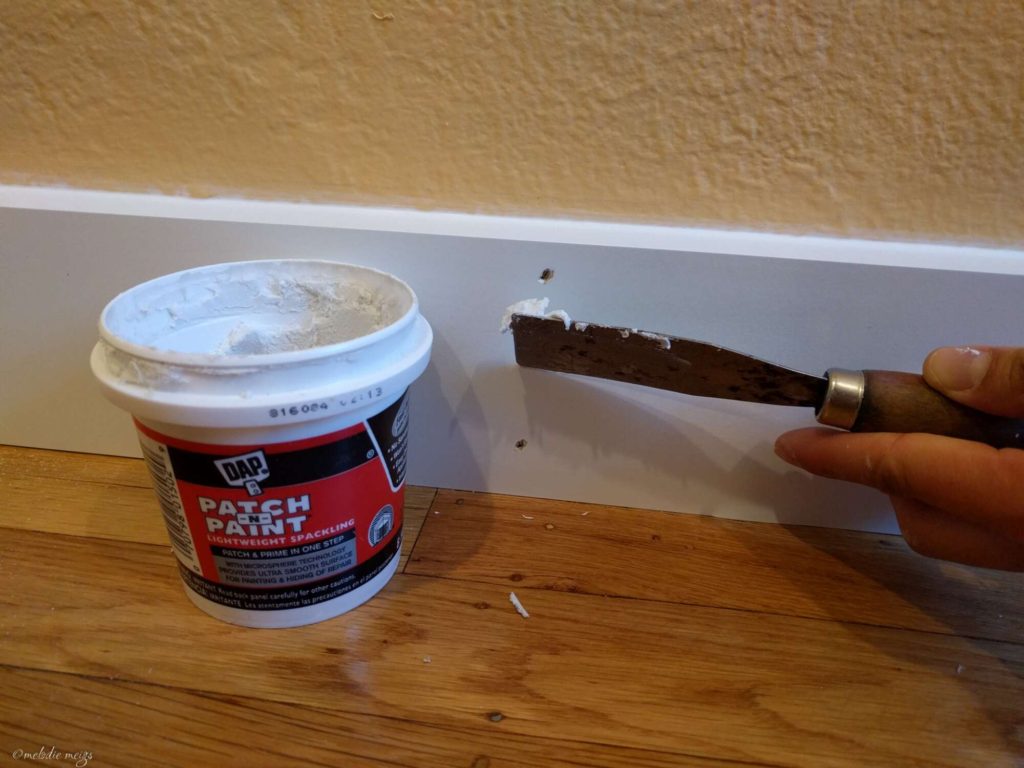
Putty Knife or Spreader: A small, flexible putty knife (about 1 to 1.5 inches wide) is perfect for applying the filler. It allows you to press the material firmly into the hole and then scrape away any excess. A plastic spreader can also work, especially for smaller tasks.
Fine-Grit Sandpaper: You'll need sandpaper to smooth out the dried filler. A grit between 180 and 220 is usually a good choice for trim, as it's fine enough to create a very smooth surface without scratching the surrounding wood. Sometimes, you might even want to go a little finer, like 320-grit, for an incredibly smooth finish before painting.
Damp Cloth or Tack Cloth: After sanding, you'll need something to wipe away the dust. A damp cloth works well, or a tack cloth can pick up even the tiniest particles, ensuring a clean surface for paint. Dust, you know, can really interfere with how paint adheres and looks.
Primer (Optional but Recommended): If you're painting your trim, a coat of primer over the filled areas can help the paint adhere better and ensure a uniform finish. This is especially true if you've used a different type of filler than what's normally on the trim, or if the filler is a different color. It helps to seal the patch, in a way, so the paint looks consistent.
Step-by-Step: How to Fill Nail Holes in Trim
Now that you have your materials ready, it's time to actually get to work on those nail holes. This process is quite simple, but taking your time with each step will really pay off in the final appearance. Just follow these directions, and you'll be well on your way to smooth trim.
Prepare the Area
Before applying any filler, it's important to make sure the trim is clean and ready. This initial step, you see, sets the stage for a good repair. If there's any loose debris or old paint flakes around the hole, your filler might not stick properly, which could lead to problems later on.
Clean the Trim: Use a slightly damp cloth to wipe down the trim, removing any dust, dirt, or grease. Let it dry completely before moving on. This ensures a clean surface for the filler to bond to.
Check for Protruding Nails: Sometimes, the nail head might be sticking out just a tiny bit. If you find any, use a nail set and a hammer to tap them slightly below the surface of the wood. You want the nail head to be recessed, creating a small dimple for the filler to sit in. This is a crucial step for a truly flat finish.
Apply the Filler
This is where you actually start to make those holes disappear. The goal here is to get enough filler into the hole to completely fill it, but not so much that you create a big mound on the surface. A little goes a long way, truly.
Scoop a Small Amount: Take a small amount of your chosen filler onto the tip of your putty knife. For very small holes, a pea-sized amount is often more than enough. You can always add more if you need to, so don't overload your knife.
Press into the Hole: Position the putty knife at a slight angle to the trim. Press the filler firmly into the nail hole, making sure it completely fills the void. This action, in a way, pushes the material deep into the opening, preventing air pockets.
Scrape Away Excess: With the same putty knife, hold it nearly flat against the trim surface and scrape away any excess filler. You want the filled area to be as flush as possible with the surrounding trim. This minimizes the amount of sanding you'll need to do later, which is quite helpful. You might need to do a couple of passes to get it just right.
Repeat if Necessary: For deeper holes, the filler might shrink slightly as it dries. You might need to apply a second thin coat after the first one has dried to ensure the hole is completely filled and level with the surface. This is pretty common for those slightly larger indentations.
Let It Dry
Patience is a real virtue during this stage. Rushing the drying process can lead to problems later, like cracking or uneven surfaces. The drying time can vary quite a bit depending on the type of filler you used and the humidity in your room, so, you know, always check the product's instructions.
Consult Product Instructions: Each filler will have specific drying times listed on its packaging. Some lightweight spackles might be ready in 30 minutes, while some wood fillers could take a few hours, or even overnight. It's really important to follow these guidelines for the best results.
Ensure Complete Dryness: The filler should feel completely dry to the touch and often changes color slightly when it's fully cured. If it still feels soft or damp, give it more time. Trying to sand wet filler will just create a mess and ruin your smooth surface.
Sanding for Smoothness
This step is where you truly refine the repair, making it blend seamlessly with the rest of the trim. The goal is to make the filled area completely invisible once it's painted. You want a surface that feels perfectly even, almost as if the hole was never there.
Use Fine-Grit Sandpaper: Wrap a piece of 180- to 220-grit sandpaper around a small sanding block or just use your fingers for small areas. A block helps distribute the pressure evenly, which is quite useful for getting a flat surface.
Sand Lightly and Evenly: Gently sand the filled area, using light, circular motions or sanding with the grain of the wood. The idea is to remove only the excess filler, making it perfectly flush with the surrounding trim. Be careful not to sand too aggressively, as you could accidentally create a dip or scratch the trim itself. You're just smoothing things out, really.
Feel for Smoothness: Run your fingers over the sanded area. It should feel completely smooth and level with the rest of the trim. If you feel any bumps or dips, apply a little more filler, let it dry, and sand again. This tactile check is, in a way, your best indicator of readiness.
Clean Up and Prime
The final steps before painting involve cleaning away any dust and preparing the surface for its new coat of color. This ensures that your paint adheres well and looks its best.
Wipe Away Dust: Use a damp cloth or a tack cloth to thoroughly wipe away all sanding dust from the trim. Dust can create a bumpy texture under paint, so getting rid of it is quite important. Make sure the trim is completely dry again before moving on.
Apply Primer (Recommended): For the best results, especially if you're painting over a patched area, apply a thin coat of primer over the filled and sanded spots. Primer helps seal the filler, prevents flashing (where the patched area looks different under paint), and provides a uniform surface for the topcoat. Let the primer dry according to its instructions. You can learn more about painting preparation on our site, which is pretty helpful.
Paint Your Trim: Once the primer is dry, your trim is ready for its final coats of paint! Apply your chosen paint color, following the manufacturer's recommendations for coats and drying times. This is the part where all your hard work truly comes together, making those holes vanish for good. You might also find some helpful trim painting tips on our site.
Tips for a Great Outcome
Getting a truly professional-looking finish when you fill nail holes in trim involves a few extra considerations. These little tricks can make a big difference in how your project turns out, ensuring that your efforts really shine.
Less is More with Filler: It's always easier to add a little more filler than to sand away too much. Start with a small amount and build up if needed. This approach, you know, saves you time and effort in the long run.
Feather the Edges: When applying and scraping the filler, try to "feather" the edges of the patch. This means gradually thinning the filler out towards the edges, making a very smooth transition to the original trim surface. It helps prevent a noticeable ridge once the filler dries.
Use a Bright Light: After sanding, shine a bright light (like a flashlight or work light) across the surface of the trim at an angle. This will highlight any imperfections, such as small bumps or dips, that you might not see otherwise. It's a really good way to catch things before you paint.
Consider a Second Pass: For a truly perfect finish, especially on high-visibility trim, consider doing a very light second sanding with an even finer grit sandpaper (like 320-grit) after the first sanding and before priming. This can achieve an incredibly smooth surface.
Work in Sections: If you have a lot of trim to do, work in manageable sections. Fill all the holes in one room or on one piece of trim, then let it dry, sand, and prime before moving to the next. This helps keep you organized and prevents you from rushing the process.
Keep Filler Sealed: Always put the lid back on your filler container tightly after use. This prevents it from drying out, which means it will be ready for your next project. Dried-out filler, you see, is pretty much useless.
Don't Forget About Corners: While this guide focuses on how to fill nail holes in trim, remember that corners and seams often need attention too. A small bead of paintable caulk can make those areas look much cleaner and more finished, creating a truly seamless appearance. This is a subtle detail that really elevates the overall look.
Frequently Asked Questions About Filling Nail Holes
People often have similar questions when they're learning how to fill nail holes in trim. Here are some common inquiries that might help you out, too.
Q: What is the best product to fill nail holes in trim?
A: For most interior trim, a lightweight spackle or a good quality wood filler is often the best choice. Spackle is easy to use for small holes and dries quickly. Wood filler is more durable and can be better for slightly larger holes or if you're working with natural wood. The best one, you know, really depends on the size of the hole and if you're painting or staining.
Q: Do I need to sand after filling nail holes?
A: Yes, sanding is a very important step. After the filler dries, it might leave a small bump or rough texture. Sanding with fine-grit sandpaper makes the filled area perfectly smooth and flush with the rest of the trim. This ensures a seamless look once the trim is painted, which is quite crucial for a professional outcome.
Q: How long does it take for nail hole filler to dry?
A: Drying times can vary a lot depending on the specific product you're using and how thick the application is. Lightweight spackles can sometimes dry in as little as 30 minutes. However, many wood fillers might need a few hours, or even overnight, to fully cure. Always check the instructions on the product packaging for the most accurate drying times, as this can really impact your schedule.

How to Fill Nail Holes in Trim: 13 Steps (with Pictures) - wikiHow

How to Fill Nail Holes: 10 Steps (with Pictures) - wikiHow
How to fill nail holes for perfect trim - patchwork&pebbles
